How to Add a CRT or Glitch Effect to Just Part of Your Screen in URP
Post-processing in URP is built to apply to the whole screen. That’s fine right up until a design calls for something localized. Like a security camera feed that should look like it’s on an old CRT monitor while the rest of the HUD stays crisp, or a sniper scope with chromatic aberration that shouldn’t bleed onto the environment around it. At that point you’re either writing custom render passes yourself, or reaching for a full-screen effect and awkwardly faking the boundary with UI overlays.
We built URP Masked Screen Effects to close that gap directly. It’s a Renderer Feature that applies real post-processing blur, pixelation, glitch, and more restricted to a RectTransform or an alpha mask texture, with the masked and unmasked areas of the screen rendered clean on either side of the boundary.
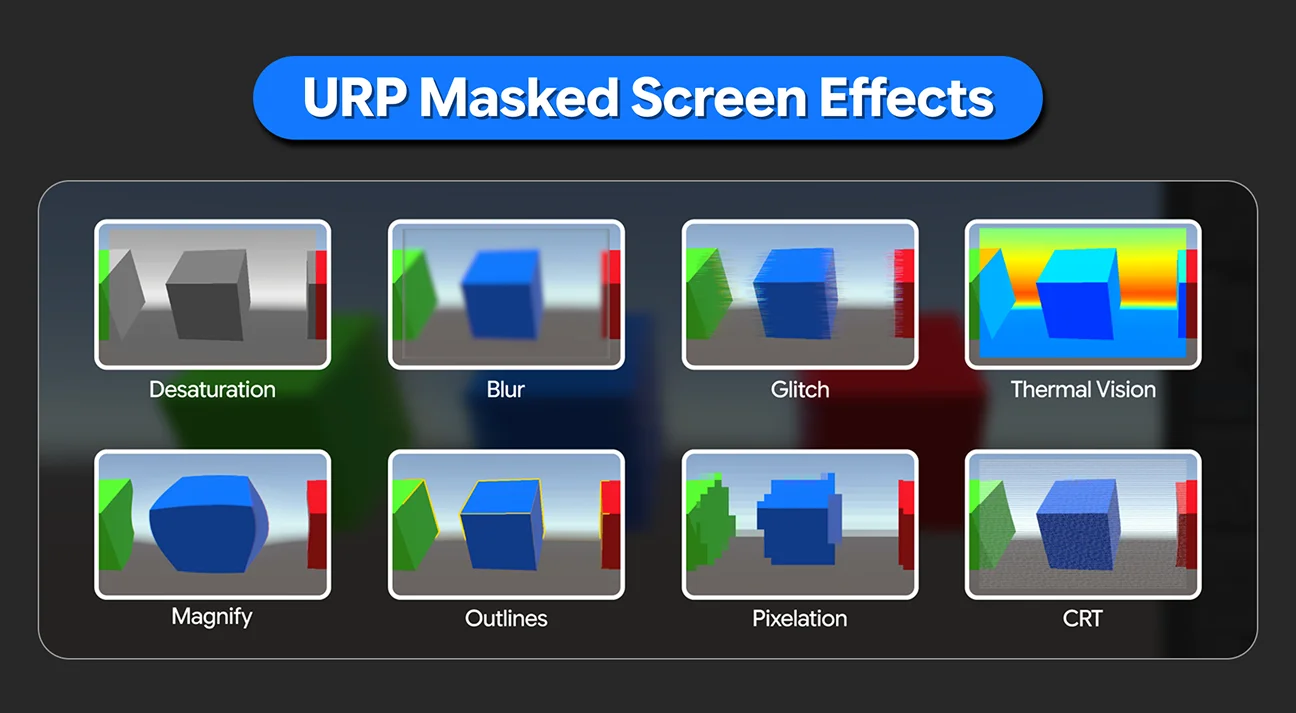
Eight Effects, All Maskable
Every effect in the pack goes through the same masking pipeline, so switching from a full blur to a CRT monitor look inside a diegetic screen is a matter of swapping which effect is assigned, not rebuilding your render setup.
- Desaturation grayscale control with a “Selective Hue” mode that keeps specific target colors vibrant while the rest of the frame desaturates the classic “red coat in a black-and-white city” effect.
- Blur high-quality multi-tap blur with optional edge highlighting, aimed at a “frosted glass” look rather than a flat gaussian smear.
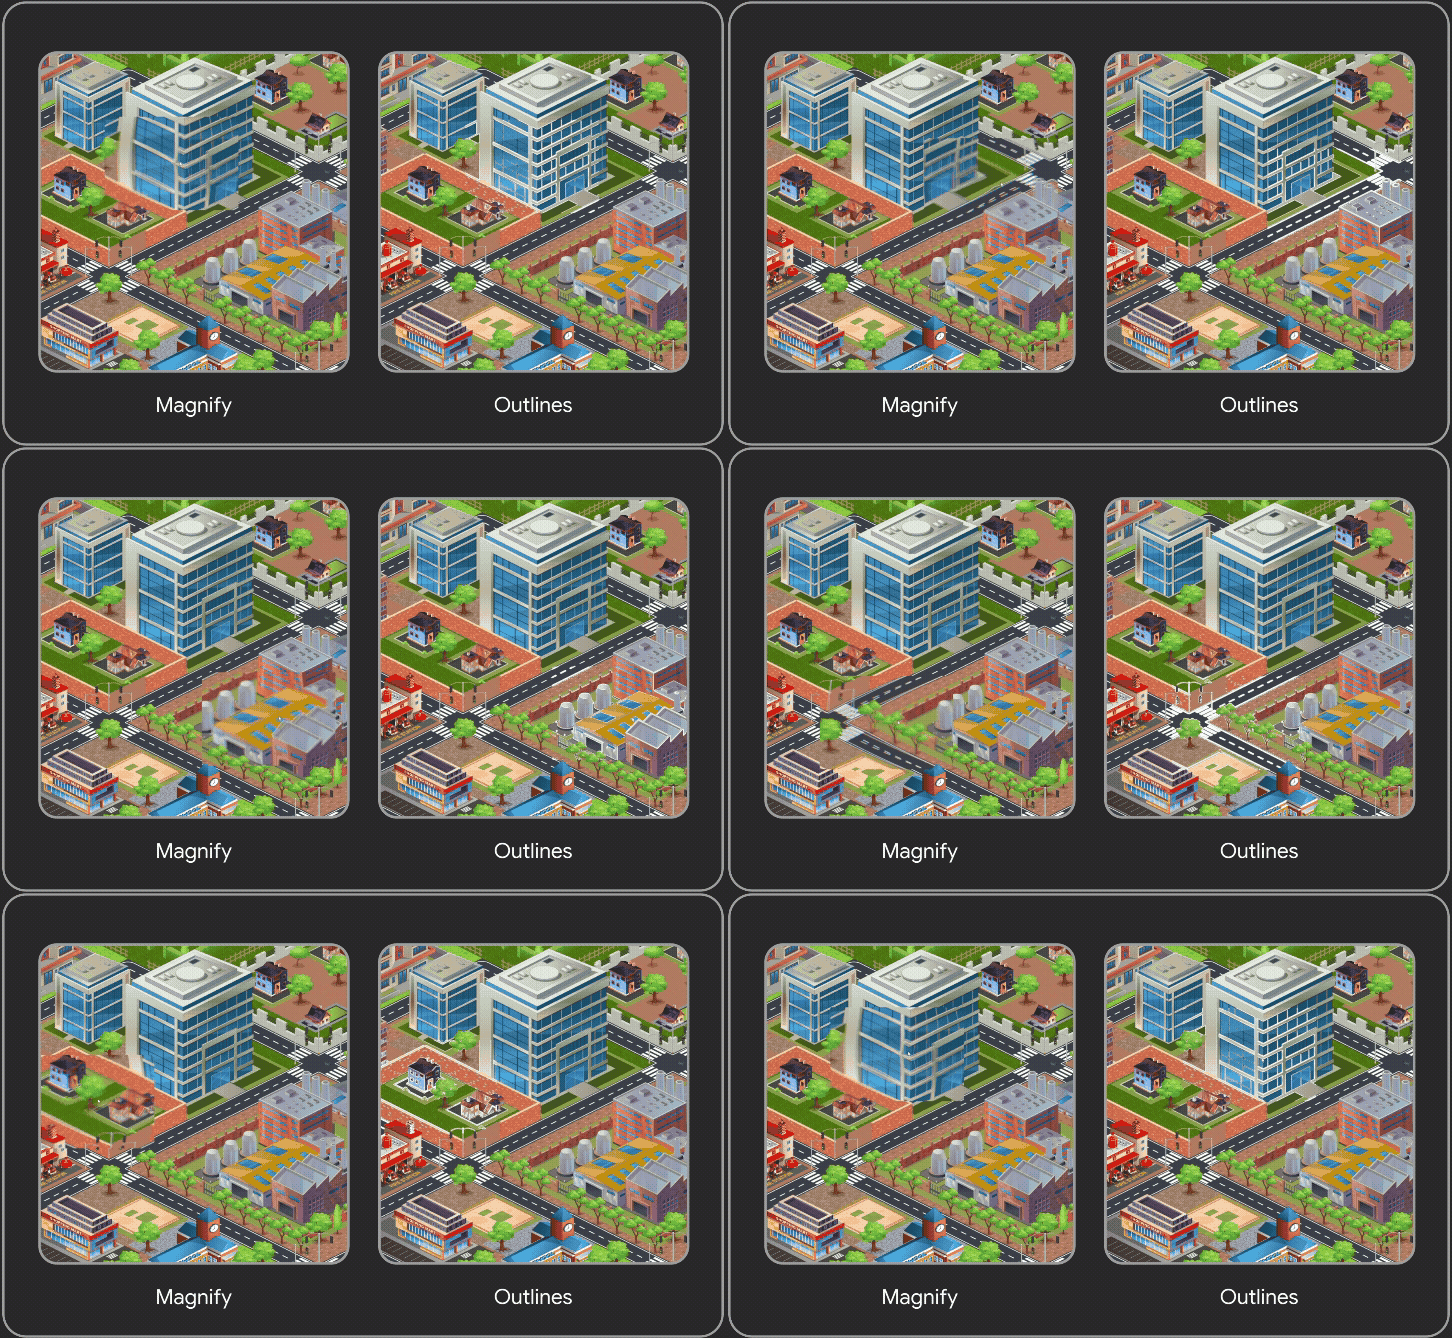
- Magnify a glass-lens effect with adjustable zoom, spherical distortion, and chromatic aberration built for scopes, magnifying glasses, or inspection tools.
- Outlines edge-detection outlines with adjustable thickness and color, for a stylized or technical/schematic look.
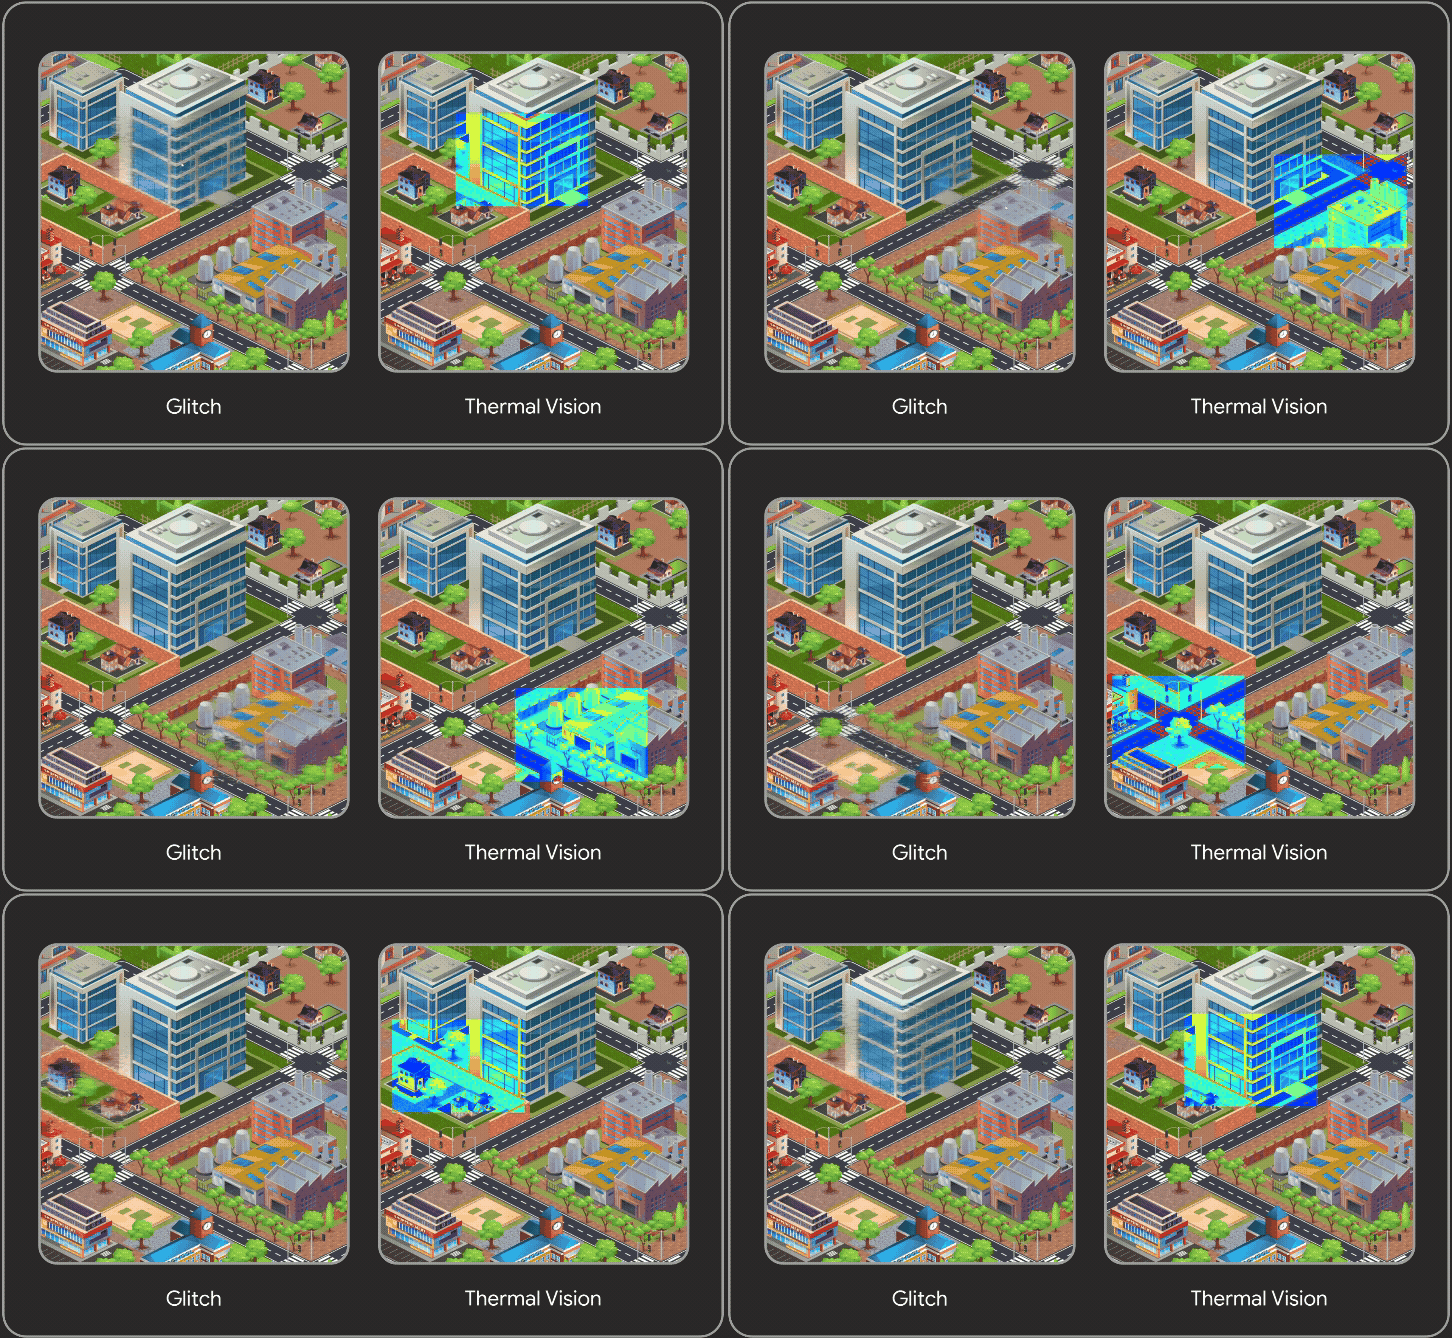
- Glitch digital artifacting with adjustable RGB split, noise scale, and horizontal distortion strength, tunable from subtle signal noise to full corruption.
- Thermal Vision heat-signature simulation using customizable color ramps driven by screen luminance.
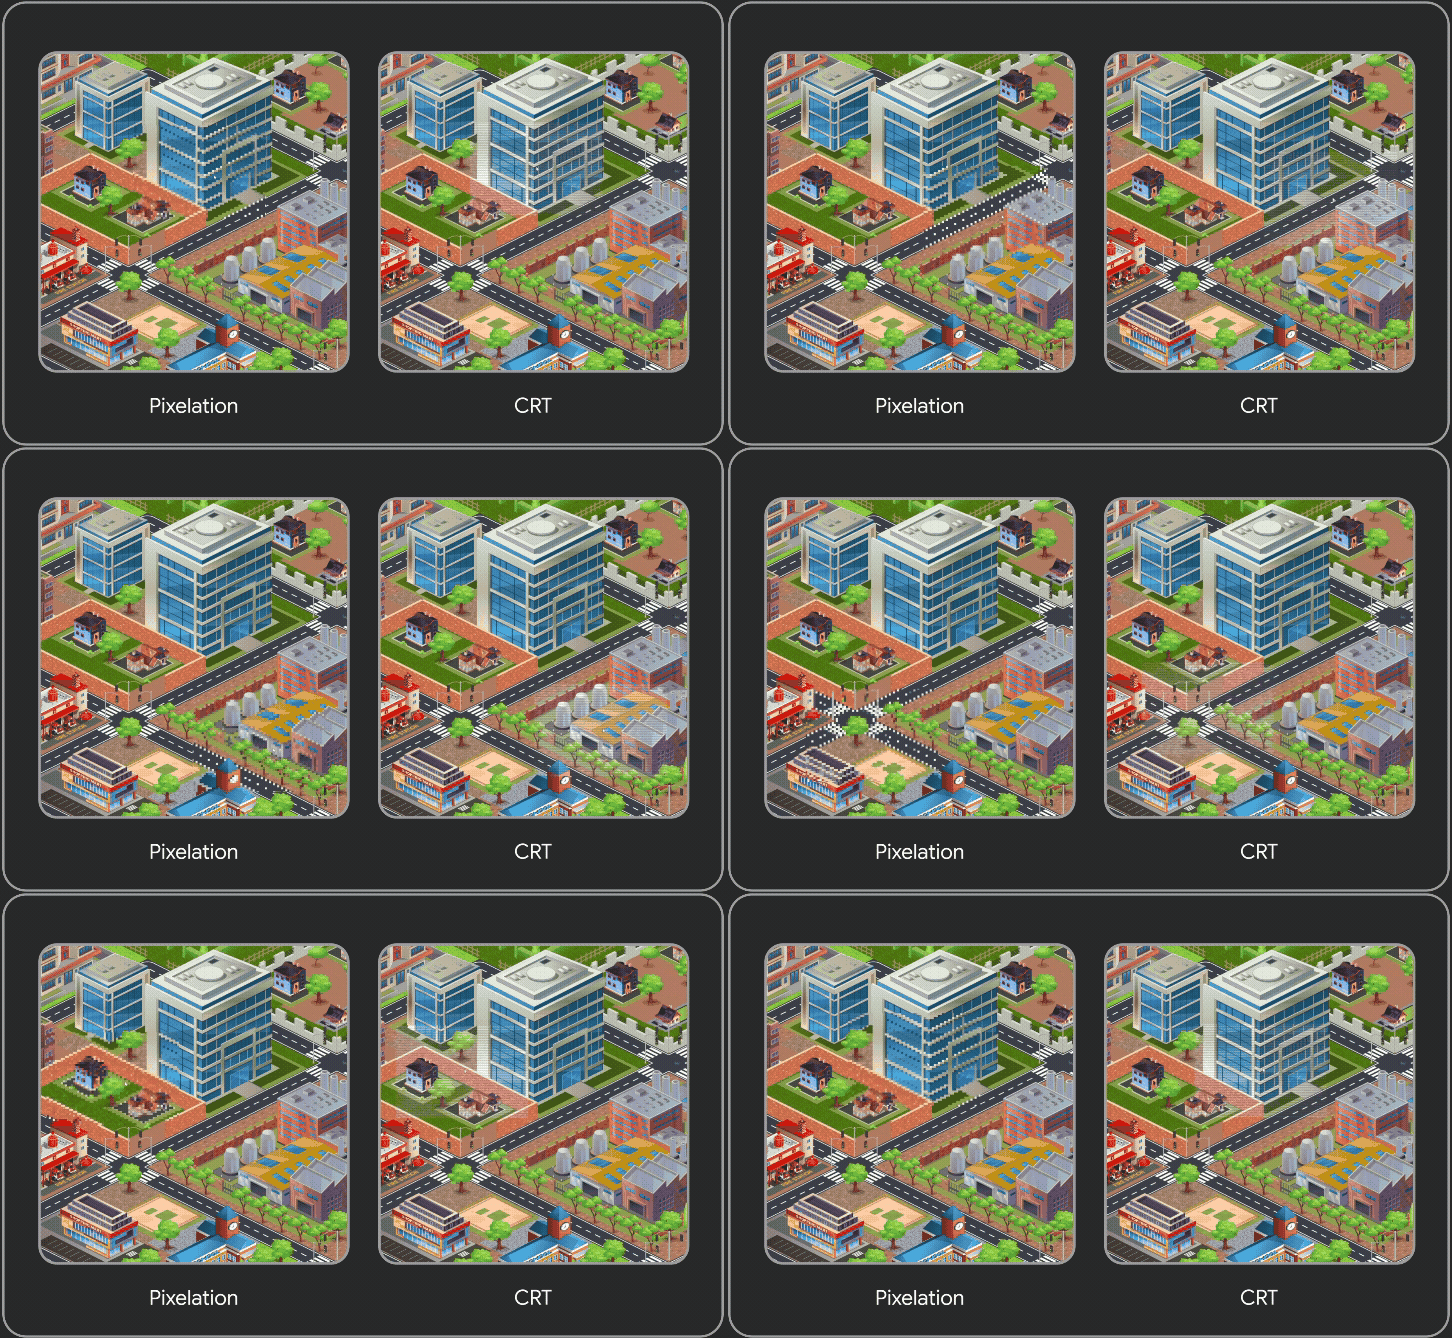
- Pixelation retro resolution downscaling that scales dynamically with the mask size, so a small mask doesn’t end up with oversized, blocky pixels relative to the rest of the screen.
- CRT old-monitor simulation with scanlines, screen curvature, and phosphor bloom built for exactly the in-world-screen use case above.
The Part That Actually Makes This Useful: Masking and Stacking
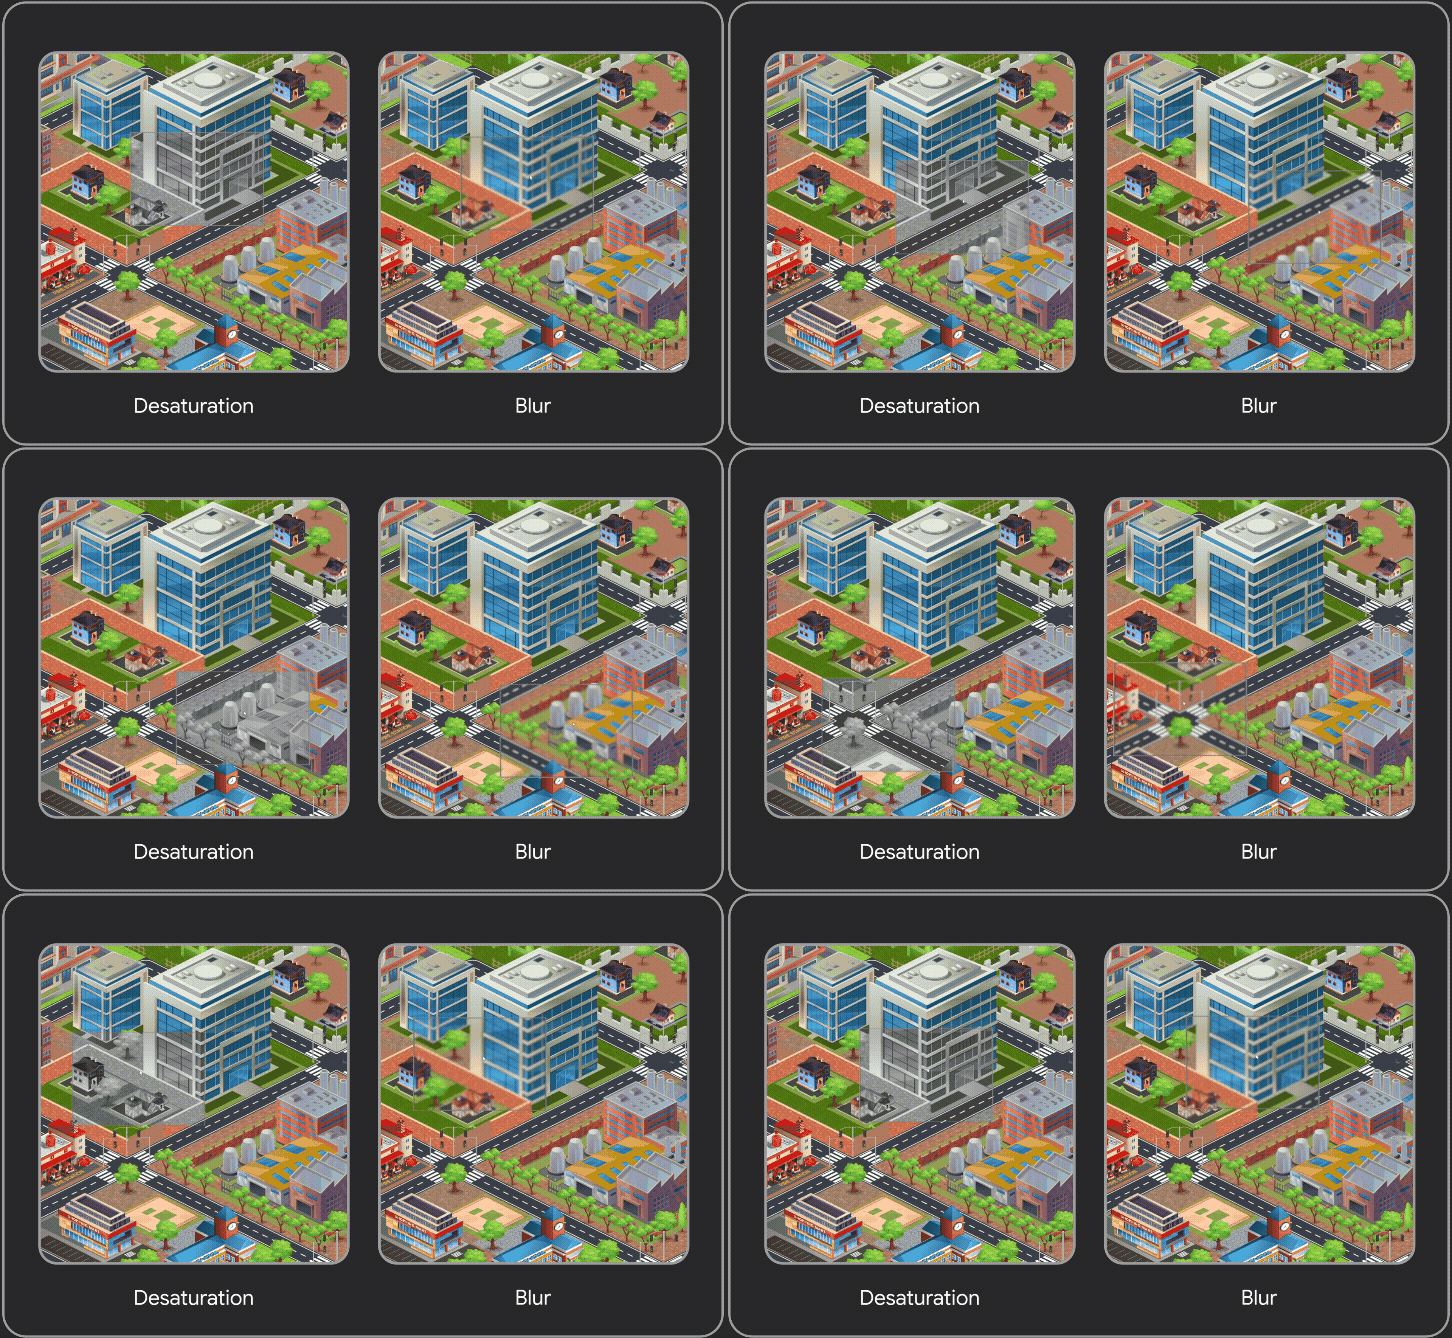
Any of the eight effects can be restricted to a specific screen area, defined either by a RectTransform or by a custom alpha mask texture. That’s the core value proposition you’re not choosing between “whole screen” or “nothing,” you’re defining exactly where an effect lives.
The other piece worth calling out is the stacking system. Effects run through what we built as a “Ping-Pong” buffer pipeline, which lets you layer multiple effects on the same masked region. Pixelation plus CRT plus Blur, for instance without the screen artifacts you’d normally get from chaining render passes naively. That combination (retro pixelation feeding into scanline/curvature simulation) is what gets you a genuinely convincing in-world monitor rather than a single flat filter.
Version-Agnostic by Design
URP’s rendering backend changed meaningfully between the legacy Command Buffer system (Unity 2021/2022) and the newer Render Graph API (Unity 6), and a lot of older post-processing assets simply don’t carry across that gap cleanly. We built this to support both from the same package Unity 2021.3 LTS and higher, with full Unity 6 Render Graph compatibility so you’re not stuck re-buying or re-implementing this if your project upgrades pipelines mid-development.
Setup: Three Steps, or the Wizard Does It For You
There’s a built-in Setup Wizard at Tools → 300Mind Studio → URPMaskedScreenEffects → Preference that automates the steps below. Worth using it first, especially if you’re setting this up for the first time but here’s what it’s actually doing under the hood, in case you need to do it manually or you’re troubleshooting.
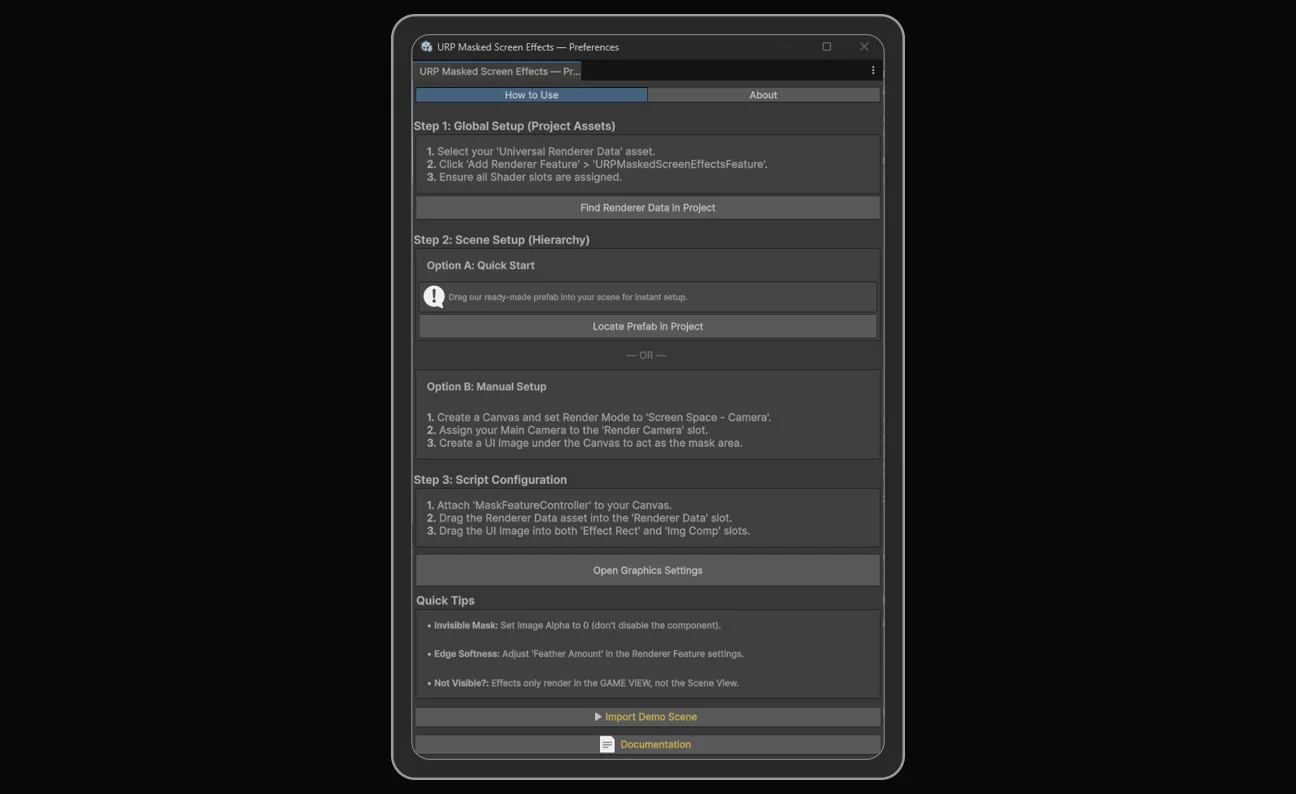
Step 1. Global Setup (Project Assets)
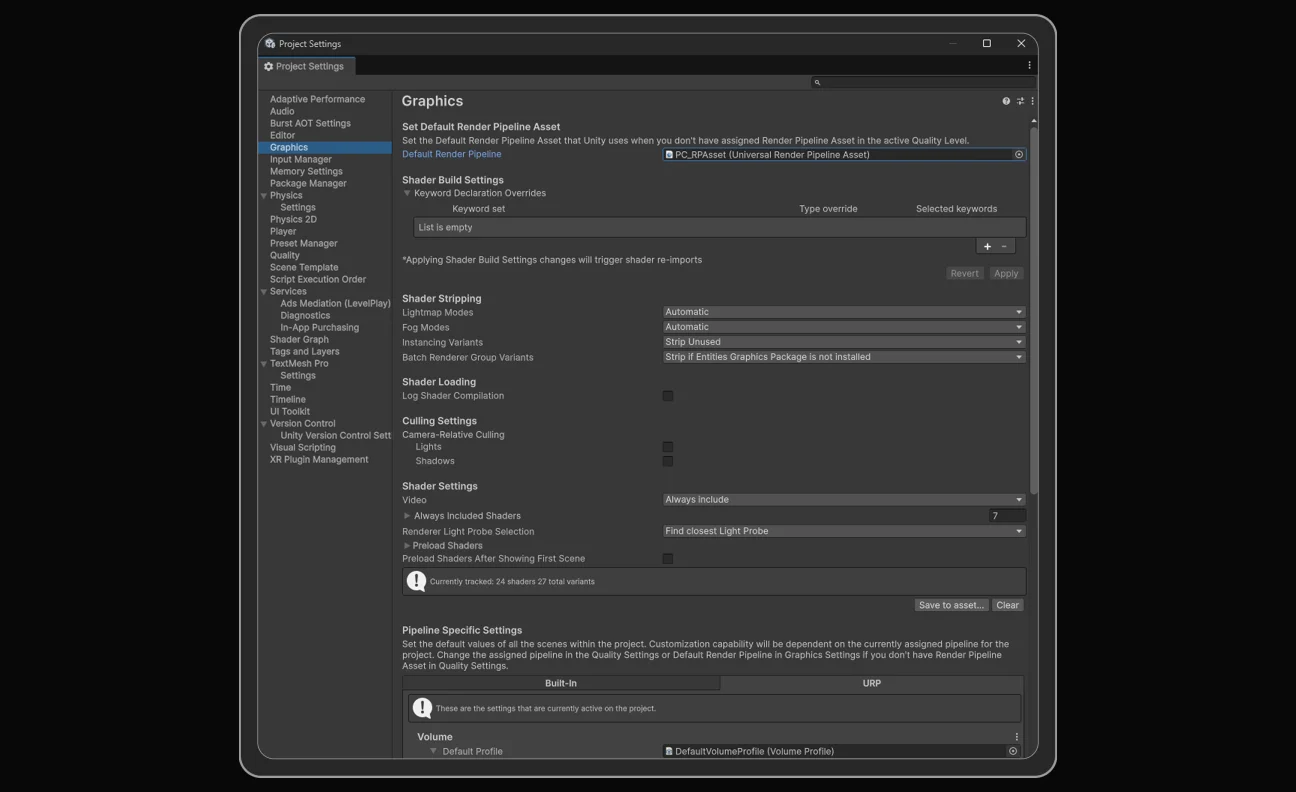
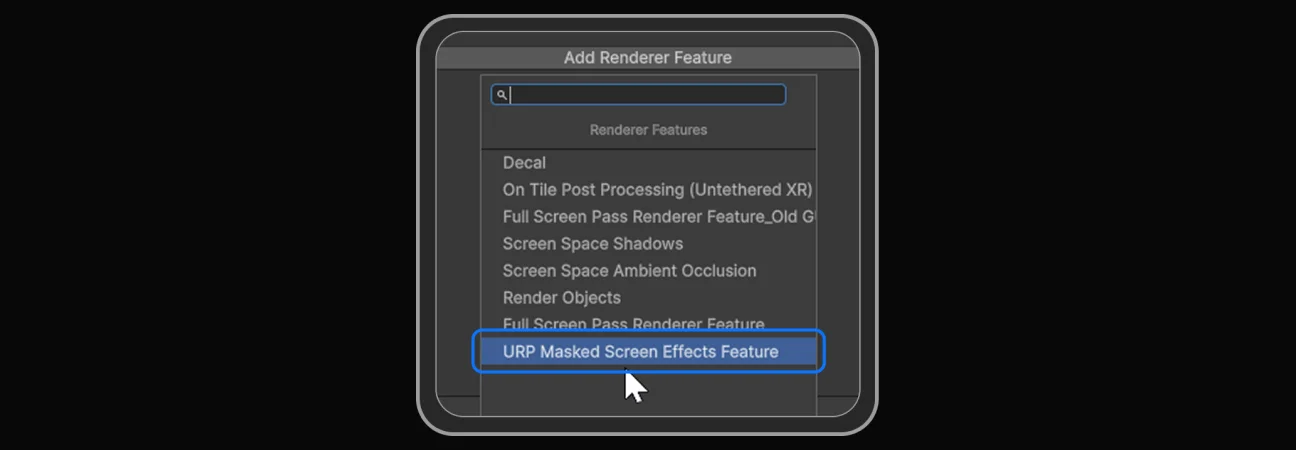
Register the feature with your graphics pipeline:
- Select your Universal Renderer Data asset in the Project window.
- In the Inspector, click Add Renderer Feature and select URPMaskedScreenEffectsFeature.
- Confirm all shader slots (Blur, Pixelation, etc.) are assigned to their respective files an empty slot here is the most common reason an effect silently does nothing.
Step 2. Scene Setup (Hierarchy)
You have two paths into the scene, depending on whether you want the fast version or full control:
- Option A (Quick Start): drag the URPMaskedScreenEffectsFeatureCanvas prefab from 300Mind\URPMaskedScreenEffects\Prefabs directly into your Hierarchy. This is the fastest way to see the system working before you wire it into your own UI.
- Option B (Manual Setup): create a Canvas set to Screen Space Camera or Overlay, assign your Main Camera to the “Render Camera” slot, and add a UI Image under the Canvas to act as the mask area.
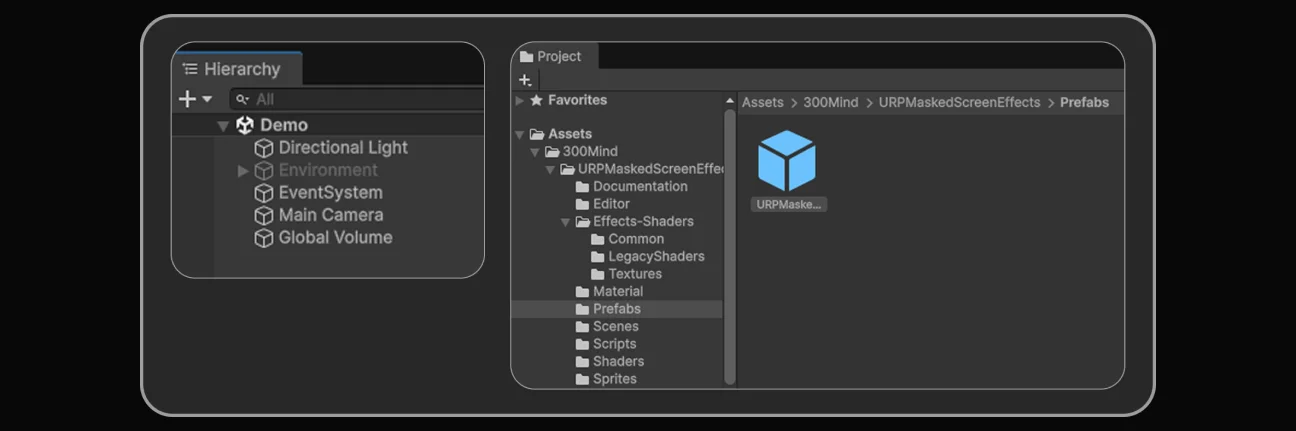
Step 3. Script Configuration
This is the step that actually connects your UI region to the renderer:
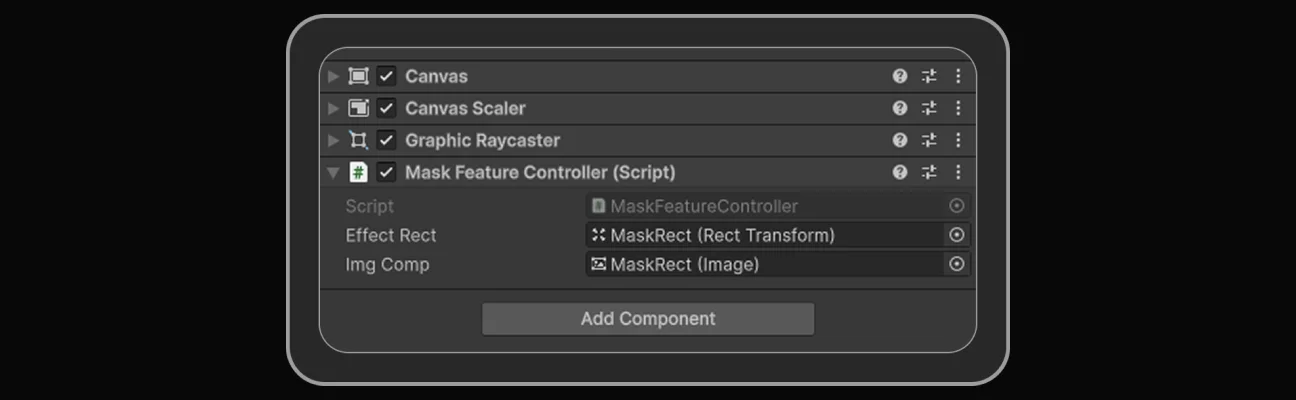
- Attach the MaskFeatureController script to your Canvas.
- Drag your Universal Renderer Data asset into the “Renderer Data” slot.
- Drag your UI Image into both the Effect Rect slot (for coordinates) and the Img Comp slot (for alpha masking).
That Img Comp / Effect Rect split matters: Effect Rect gives the system the screen-space bounds to work within, while Img Comp supplies the alpha channel that defines the actual mask shape inside those bounds. A rectangular RectTransform and a custom-shaped alpha mask both go through the same two slots it’s the image’s alpha content that decides whether your masked region ends up as a clean rectangle or an arbitrary shape.
Technical Requirements
| Requirement | Detail |
| Unity Version | 2021.3 LTS or higher (fully supports Unity 6) |
| Pipeline | Universal Render Pipeline (URP) only |
| Hardware | Compute Shader support, Shader Model 4.5+ (desktop/mobile) |
Why We Built It as One Renderer Feature Instead of Eight Separate Assets
It would have been simpler to ship each effect as its own small package easier to scope, easier to price individually. We didn’t, because the actual production need this solves is combining effects on the same masked region, and that only works cleanly if they’re all running through one shared pipeline with a consistent buffer system. Shipping them separately would have meant every combination (CRT + Pixelation, Blur + Outlines) needed its own compatibility testing between packages instead of just working.
Get URP Masked Screen Effects
Live now on the Unity Asset Store built for any URP project that needs localized post-processing instead of a full-screen filter.
Building in Unreal or Blender instead? Browse our full catalog: